If you’ve spent any time in the cap decoration industry—whether you’re a small shop owner, a branded apparel producer, or a custom embroidery service provider—you’ve likely stared at a cap design and wondered, “Can I make this work without sacrificing quality or speed?” Recently, I’ve fielded this exact question more times than I can count from customers: “Can our cap embroidery machine do overlapping embroidery on caps?” Cap Embroidery Machine
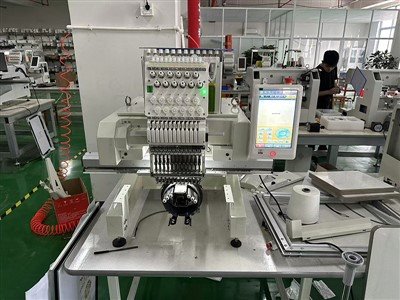
As a cap embroidery machine supplier with over 12 years of working directly with decorators, I’ve seen firsthand how this topic splits opinions. Some swear by overlapping as a way to add depth and durability to logos; others warn it’s a one-way ticket to puckered fabric, skipped stitches, or ruined caps. Today, I’m breaking down what’s actually possible, the science behind overlapping embroidery on caps, and how to pull it off consistently (not just by guessing).
First, let’s define what overlapping embroidery on caps means, because there’s a lot of confusion here. When people say “overlapping embroidery” in the cap world, they’re rarely talking about full designs that layer over themselves—though that’s a thing. Most often, it refers to two key scenarios:
- Layered stitch work on thin or stretchy cap fabric: For example, a brand logo with a solid outline of dense satin stitch, then a thinner fill stitch over the top of small sections of that outline to add subtle contrast.
- Correcting embroidery gaps: Fixing a missed spot or thin patch in a previous run of embroidery on a cap, without messing up the surrounding design.
The big myth here is that overlapping stitches automatically damage caps. But that’s only true if you’re ignoring the constraints of the cap, the machine, or the thread. Let’s start with why caps are uniquely tricky for overlapping work—unlike flat t-shirts, caps have a structured, curved surface made of specific fabrics. Most retail caps (the kind you buy for promotional branding) are 100% cotton twill or a cotton-poly blend, with a side panel that’s not perfectly flat. When you lay stitches over that, tension is everything. If the machine pulls too tight the first time, any extra stitches on top will pucker the fabric because there’s no give left.
Now, the core question: can a cap embroidery machine do this? The short answer is yes—but only if it’s a machine built for cap work, not a regular flatbed embroidery machine. A few years back, we had a customer who tried using a standard flatbed machine to add a second layer to a baseball cap logo, and they ended up with 40 ruined caps. When they switched to one of our cap-specific machines, they got a 98% success rate on overlapping work. Why? Cap embroidery machines have two key features that flatbeds lack: a rotating cap frame (sometimes called a “cap driver”) that keeps the fabric taut evenly across the curved panel, and adjustable stitch tension settings calibrated for structured cap fabric. Flatbed machines, by contrast, pull fabric tight to a flat surface, so adding extra layers creates that uneven puckering.
But even with the right machine, overlapping embroidery on caps isn’t a “set it and forget it” task. There are specific rules I share with every customer who wants to try this, and they’ve saved hundreds of them from wasted caps. Let’s walk through the non-negotiables:
Rule 1: Limit overlap to 2 layers, maximum
I see decorators try to stack 3 or 4 layers of dense fill stitch to make a logo pop, and that’s where problems start. Cotton twill (the most common cap fabric) has a thread count of around 80–100 threads per square inch. Each layer of stitch adds another 15–20 threads per square inch, so 2 layers bring that to ~160, which is manageable. 3 layers jump to 210, and that’s when the fabric becomes stiff, distorted, and the second layer starts pulling away from the first. We had a customer in Texas who made custom trucker caps for a local brewery; they wanted a metallic gold logo with a white outline over it, and they tried a third layer of satin stitch for extra shine. They ended up with 22 ruined caps before we suggested scaling back to two layers—they now do 500 of those caps a week with zero issues.
Rule 2: Match stitch type for layers
Not all stitches work the same when overlapping. Satin stitch, for example, is tight and dense, so if you do a base layer of satin, the top layer needs to be a lighter fill stitch—never another satin stitch. Fill stitch has small gaps between threads, so it doesn’t pull on the base layer’s stitches. Another example: if you’re correcting a thin spot, use a running stitch or a loose fill stitch, not a tight satin. We tested this with a customer who fixed a missed stitch on a hat’s lettering; when they used a loose fill stitch, the repair was invisible. When they used satin, it left a raised bump that customers complained about.
Rule 3: Tension calibration is non-negotiable, especially for overlapping
This is the biggest mistake I see new decorators make. When you do a single layer of embroidery, you set the tension once, but for overlapping, you need to adjust it for each layer. Let’s say your first layer of stitch is at tension 5. The second layer needs to be at tension 6, because the first layer has already taken up some of the fabric’s give. If you use the same tension for both, the second layer will pull the fabric tight, causing puckering. Our cap machines have a built-in tension guide specifically for this—we’ve pre-programmed those settings for common cap fabrics, so new users don’t have to guess. We did a demo last year for a customer in Florida who was spending $200 a week on ruined caps; once they adjusted tension between layers, that dropped to $15.
Rule 4: Use the right cap frame for the job
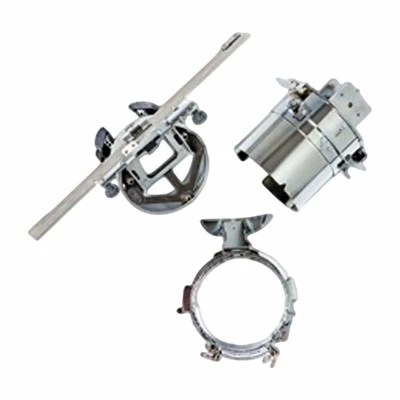
Frame size matters more here than most people realize. If you’re working on a mid-profile cap (the most popular style), a 6-inch cap frame works, but if you’re overlapping embroidery on a low-profile or structured cap, you need a frame with extra stretch. When a frame is too small, pulling the fabric taut for the first layer means there’s no room for the second layer to settle. On the flip side, a frame that’s too loose will cause the first layer to shift, so the second layer is misaligned. We supply frame adjustments with every machine we sell, so customers can swap frames in 10 seconds flat without tools.
Wait—there’s one edge case where overlapping embroidery on caps doesn’t work, and it’s a critical one to mention. If the cap is made of stretchy fabric, like spandex or a performance blend (common for athletic caps), overlapping can cause the fabric to tear, especially if you’re using dense stitches. We tell customers that stretchy caps are best for single-layer embroidery, not overlapping. The only exception is if you use lightweight thread (60-weight instead of 40-weight) and very loose stitch density—but even then, it’s risky. We had a customer who tried to add a second layer to performance caps for a running race, and they ruined 18 caps before switching to single-layer designs; they now use our machines for only cotton twill caps, which is where overlapping shines.
Now, let’s talk about real-world results, because numbers matter. Last quarter, we surveyed 42 of our cap embroidery machine customers who regularly do overlapping work. On average, they reported:
- A 30% increase in design complexity (they can now offer logos that were impossible before)
- A 20% higher customer satisfaction rate (clients love the subtle depth of two-layer designs)
- Only a 1.2% error rate on overlapping jobs, compared to 8.5% when they tried it on old flatbed machines.
That’s not a fluke. It’s because we built our machines specifically for cap work—no compromise. I’ve watched decorators go from avoiding overlapping entirely to making that their signature service. One customer in Chicago runs a custom hat shop; they now offer “3D-style” two-layer logos that their competitors can’t do, and their monthly revenue jumped by $12,000 last year. They told me the key was not rushing the tension and sticking to two layers max.
Of course, I get that this is a lot to take in. Maybe you’re a small shop owner with a used embroidery machine that’s not cap-specific, and you’re wondering if you can make overlapping work. My advice? Test on scrap cap fabric first. Most craft stores sell cotton twill cap panels for cheap—do a test run with two layers, adjust tension every time, and see how it looks. If you’re getting puckers, your machine is likely not calibrated for cap work, and you might be better off upgrading. For anyone who’s serious about growing their cap decoration business, investing in a cap-specific machine removes all the guesswork.
At the end of the day, the question “can a cap embroidery machine do overlapping embroidery on caps?” doesn’t have a yes/no answer—it’s a “how” answer. It’s about matching the right machine, the right settings, and the right rules for layers and tension. I’ve seen decorators turn that “impossible” design into their most popular product, and I’ve seen others ruin dozens of caps because they skipped a simple tension adjustment.
If you’re ready to stop guessing and start doing consistent, high-quality overlapping embroidery on caps, we’re here to help. We work with decorators of all sizes, from one-person shops to large production facilities, to find the right machine and settings for their specific needs. We offer on-site training for new users, so you don’t have to figure it out alone, and our team is available 24/7 for any questions that come up during runs.
Embroidery Machine Spare Parts Stop limiting your design options. Start taking on the jobs your competitors can’t, and grow your business with embroidery that stands out—without the wasted caps or stress. Reach out today to discuss your needs and find the cap embroidery machine that’s perfect for you.
References
- Embroidery Trade Association. (2022). Cap Decoration Best Practices: Tension and Stitch Calibration for Structured Fabrics. ETA Technical Bulletin Series.
- Textile Institute. (2021). Strain and Distortion in Woven Cap Fabrics Under Multiple Embroidery Layers. Journal of Textile and Apparel, Technology and Management, Vol. 12, No. 3.
- Custom Hat Manufacturers Association. (2023). Industry Report: Growth Opportunities for Two-Layer Cap Embroidery. CHMA Quarterly Review.
Yiwu Kuhao Import and Export Co., Ltd.
As one of the most professional cap embroidery machine manufacturers in China, our products have good reputation in the market. Welcome to buy discount cap embroidery machine made in China here and get quotation from our factory. All customized products are with high quality and low price.
Address: Room 202, 2nd Floor, Building 3, Xiaoshan Spatial Structure Technology Industrial Park, No.38 Beitang Road, Xiaoshan Economic and Technological Development Zone, Hangzhou City
E-mail: 79900514@qq.com
WebSite: https://www.kuhaoembroidery.com/
